8
Horst Sievert
Die Idee einer Mini-Wetterstation beschäftigt mich schon etwas länger: Man nehme einen Mikrocontroller mit Sensoren für Temperatur, Luftdruck und Luftfeuchtigkeit, möglichst auch mit einem Lichtsensor und einem UV-Sensor. Eine derartige Mini-Wetterstation sollte sich idealerweise draußen frei bewegen lassen. Diese Beweglichkeit könnte man erreichen, wenn man die Messwerte der Sensoren über die LoRaWAN-Technik überträgt und ein Solarpanel für die Stromversorgung nutzt.
Der schöne Sommer des Jahres 2020 hatte es auch mit uns Norddeutschen gut gemeint. Da wo das Wetter oft durchwachsen ist, d.h. viel Regen fällt und wenig Sonne scheint, war wochenlang keine Wolke am Himmel zu sehen. Die Idee sollte also in die Tat umgesetzt werden. Doch irgendwie mussten zunächst Probleme gelöst werden.
Mikrocontroller und Sensoren
Mit dem Mikrocontroller (Arduino MKR WAN 1300), den ich verwenden wollte, hatte ich bereits drinnen auf dem Schreibtisch experimentiert. Dazu kam ein weiteres Bauteil (Arduino ENV-Shield), auf dem die Sensoren sehr übersichtlich angeordnet sind und das sich elegant auf den Mikrocontroller stecken lässt.
Ein erster Versuch mit diesen Sensoren auf der Terrasse zeigte zwei Dinge. Einerseits sollte man den Sensor für Temperatur und Luftfeuchtigkeit nicht der prallen Sonne aussetzen. Andererseits bekommt man nachvollziehbare Messwerte für den UV-Index, UVA und UVB nur, wenn man die Sensoren immer in einem optimalen Winkel zur Sonne anordnet, z.B. 45 Grad. Damit stehen sich zwei Wünsche krass entgegen und es gibt das Problem Nummer 1.
Solarpanel
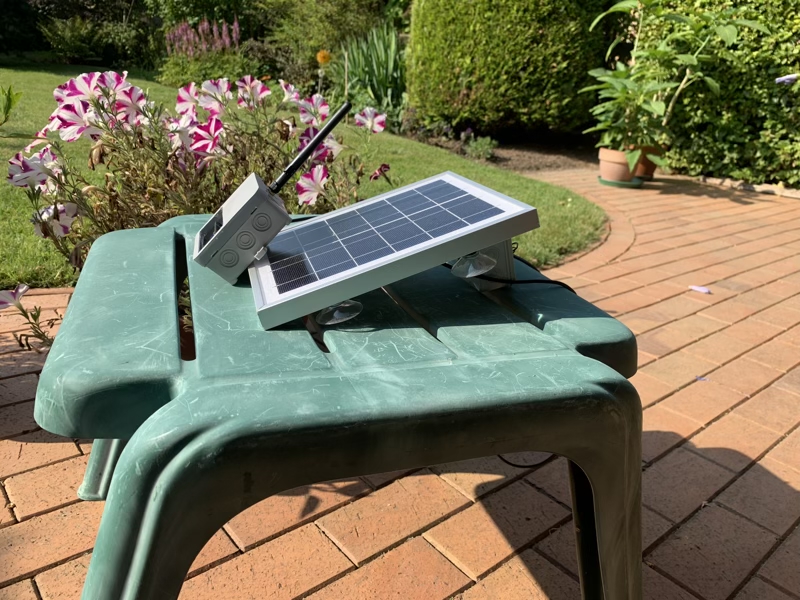
Mit einem Solarpanel macht man die Stromversorgung unabhängig von einer Steckdose. Diese Überlegung hat mich zur Anschaffung eines preiswerten Bausatzes (5W/1A) und eines 2500 mAh Akkus veranlasst.
Die Teile können einfach zusammengesteckt werden und liefern damit die erforderliche Spannung zum Betreiben kleiner Bausätze wie meiner Wetterstation. Meine ersten Versuche zeigen, dass dem Akku enge Grenzen gesetzt sind. Ohne Solar Panel ist er nach wenigen Tagen leer. Über das Power-Management wird aber das Panel tagsüber automatisch zugeschaltet, so dass der Versuchsaufbau etwa 4 Tage betrieben werden konnte.
Während der Schönwetterperioden ist also ein Freiluftbetrieb bei Sonnenschein problemlos möglich. Wie die Situation bei bedecktem Himmel aussieht, kann ich wohl erst in Zukunft sagen. Aber es dürfte eng werden und die Stromversorgung ist damit Problem Nummer 2.
Messwerte
Etwas verwirrend sind die Maßeinheiten der angezeigten Messwerte. Temperatur in Grad, Luftfeuchtigkeit in Prozent und Luftdruck in Hektopascal gehört zur Allgemeinbildung oder man findet es schnell heraus. Ich habe es für die Beleuchtungsstärke (= Helligkeit) in Lux gerade noch geschafft. Aber die UV-Maßeinheiten haben mich dann doch sehr beschäftigt. Welche Werte für UVA und UVB kann man in unseren Breiten erwarten?
Eine große Hilfe war schließlich diese Information der UNI-Kiel, die mir nach einiger Zeit auf den Bildschirm kam. Irgendwie stimmte aber das Verhältnis UVA/UVB nicht ganz und ich denke: Sollte das Problem Nummer 3 sein?
Eigenartig ist auch, dass sich in der Vollsonne für die Luftfeuchtigkeit Werte um 600 % einstellen. Ist der Sensor bei Temperaturen um die 50 Grad überlastet? Arbeitet mein Mikrocontroller bei diesen Temperaturen nicht mehr korrekt? Nebenbei: Auch der Betrieb eines Akkus bei mehr als 50 Grad Umgebungstemperatur macht mich nachdenklich. Sollte das Problem Nummer 4 sein?
Fazit
So ganz einfach ist der Bau der Mini-Wetterstation nicht. Sicher fallen dem erfahrenen Bastler noch ein paar Tipps ein. Aber es ist doch schön, wenn beim Basteln auch ein Erfahrungsaustausch stattfindet. Und: Nicht immer gelingt eine perfekte Lösung im ersten Schritt. Aber so viel ist sicher: Basteln macht Spaß.
nächstes Kapitel
The idea of a mini weather station has been on my mind for a while: Take a microcontroller with sensors for temperature, air pressure and humidity, if possible with a light sensor and a UV sensor. Such a mini weather station should ideally be able to move freely outside. This mobility could be achieved if the measured values of the sensors were transmitted via LoRaWAN technology and a solar panel is used for the power supply.
During the beautiful summer of 2020 the weather gods were smiling upon us even in the North of Germany, where the weather is often mixed, i.e. usually with a lot of rain and little sunshine. But in 2020 no cloud was seen in the sky for weeks. So the idea should be put into practice. But somehow first some problems had to be solved.
Microcontrollers and sensors
I had already experimented inside on my desk with the microcontroller (Arduino MKR WAN 1300) which I wanted to use. Moreover I used another component (Arduino ENV shield), where the sensors are arranged very clearly an it can very elegantly be plugged into the microcontroller.
A first attempt using these sensors on the terrace showed two things. On the one hand, you shouldn’t expose the temperature and humidity sensor to the blazing sun. On the other hand, you only get traceable measured values for the UV index, UVA and UVB, if you always arrange the sensors at an optimal angle to the sun, e.g. 45 degrees. This means that my two requirements are very much opposed to one another and here you have problem number 1.
Solar panel
With a solar panel you make the power supply independent of a socket.This consideration led me to purchase an inexpensive kit (5W / 1A) and a 2500 mAh battery.The parts can simply be plugged together and thus provide the necessary voltage for operating small kits such as my weather station. My first attempts showed that the battery was flat very speedily. Without a solar panel, it is flat after just a few days. However, the panel is automatically switched on during the day via the power management, so that the test setup could be operated for about 4 days.
During periods of good weather, open-air operation in sunshine is therefore possible without any problems, but it is difficult to assess the situation when the sky is overcast and I suppose it is going to be difficult so the power supply is problem number 2.
Readings
The units of measurement for the displayed measured values are somewhat confusing. Temperature in degrees, humidity in percent and air pressure in hectopascals belong to the general education or you can find it out quickly. I just managed to get the illuminance (= brightness) in lux. But then I was really concerned with the UV units. Which values for UVA and UVB can you expect in our latitudes?
This information (in German) from UNI-Kiel, which came to my screen after a while, was a great help. Somehow the UVA / UVB ratio wasn’t quite right and I thought: should that be the problem number 3?
It is also strange that in full sun the humidity values are around 600%. Is the sensor overloaded at temperatures around 50 degrees? Does my microcontroller no longer work correctly at these temperatures? By the way: Operating a battery at ambient temperatures of more than 50 degrees might also be questionable. Should this be problem number 4?
Conclusion
The construction of the mini-weather station is not quite simple. The experienced hobbyist is sure to come up with a few more tips. But it’s nice when there is an exchange of experiences while doing handicrafts. Moreover a perfect solution will not always work in the first instance. But one thing is certain: tinkering is fun.
